You’ve seen fade haircuts everywhere – on athletes, entertainers, and men who seem to know what they’re doing. You can call this a contemporary classic. But pulling one off yourself? Things can get complicated at that point.
The good news? You can achieve a flawless fade boys haircut at home with the right supplies, a little dedication, and a thorough how-to. No overpriced barbershop. No bizarre patchy attempts.
What Makes a Fade a “Fade”?
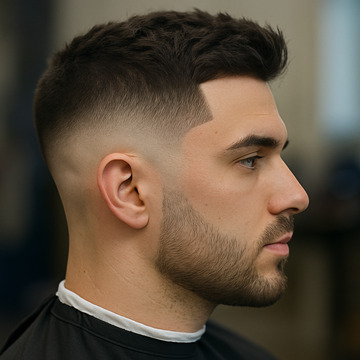
With a real fade, hair progressively transitions from short (or skin) along the edges or neckline to longer hair at the crown. Making the change smooth is the aim; avoid awkward jumps and harsh lines. Moreover, the versatility of the fade is what makes it so well-liked. It complements all hair types, works on the majority of face shapes, and may be as subtle or sharp as you like.
Understanding Fade Types
Now you know what is a fade haircut, but not all fades are created equal. Select the best kind for your personality or the contours of your head before you start buzzing.
- Low Fade Haircut: Just above the ear is where it begins. Delicate & tidy, it is excellent for square or round faces.
- Mid Fade Haircut: Begins at the midpoint of the head. Increases the contrast between the sides and the top.
- High Fade Haircut: Starts closer to the temple. Bold, edgy, and sharp.
Every type of fade can be achieved with bald skin or with a little stubble left at the base. It’s your call. However, always picture the shape you want first. At what point does the fading begin? What is the ideal foundation length?
Face Shape Guide
| Face Shape | Recommended Fade | Why It Works |
| Round | Low Fade, Drop Fade | Adds vertical definition, reduces roundness |
| Oval | Any (Low, Mid, High) | Versatile shape—everything looks balanced |
| Square | High Fade, Skin Fade | Sharpens the jawline, adds edge |
| Heart | Mid Fade, Taper Fade Haircut | Balances narrow chin and wider forehead |
| Diamond | Low or Temp Fade | Keeps sides clean without exaggerating cheekbones |
| Long/Rectangular | Low Fade, Taper Fade | Avoids making the face appear even longer |
Read More: How to Choose the Right Skin Fade Haircut Based on Your Face Shape
Hair Texture Guide
| Hair Type | Best Fade Type | Why It Works |
| Straight | High or Mid Fade | Shows contrast and sharp transitions |
| Wavy | Low or Mid Fade | Keeps natural volume, easy to blend |
| Curly | Skin Fade, Drop Fade | Defines shape, manages density |
| Coarse/Thick | High Skin Fade | Reduces bulk, gives clean edges |
| Fine/Thin | Low Fade, Taper Fade | Keeps volume at the top, avoids scalp exposure |
What You Need Before You Start
Make sure everything is set up correctly before plugging in the clippers. A clean fade requires the proper equipment in addition to expertise.
Tools Checklist:
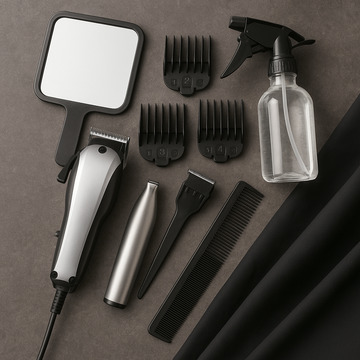
- Hair clippers (with adjustable taper lever and guards)
- Trimmer or outliner (for the neckline and edges)
- Clipper guards (usually from #0.5 to #4)
- Comb (preferably a barber comb for sectioning and blending)
- Hand mirror or 3-way mirror (for back and side visibility)
- Spray bottle (light misting for control, optional)
- Barber cape or towel (to avoid itchy cleanup)
Clipper quality matters. If yours sounds like it’s choking or tugging hair, it’ll ruin your fade. Invest in a reliable pair with a strong motor—brands like Wahl, Andis, or Babyliss Pro are great picks
How to Do a Fade Haircut with Clippers Step By Step Guide
This is the core section. Follow each step carefully. Don’t rush the process.
Step 1: Prep the Hair
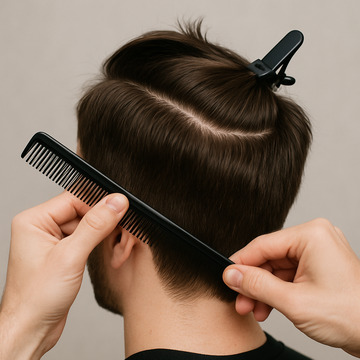
Start with clean, dry hair or slightly damp if you’re more comfortable that way. Comb the hair into its natural direction. This helps you spot growth patterns, cowlicks, and uneven areas.
Separate the top part from the edges with your comb. To prevent accidentally cutting the top hair, you can either comb it away or clip it up.
Step 2: Start with the Longest Guard

Clipper guards are numbered. The length of the cut increases with the number.
Start with the guard you want to stick with for the longest part of the fade; a #3 or #4 is typically used for a more conservative look. Now, use rhythmic scooping motions to work your way up from the bottom.
Make sure both sides are on an equal footing. After all, this is the start of symmetry.
Step 3: Set the Guideline (Lowest Point of the Fade)
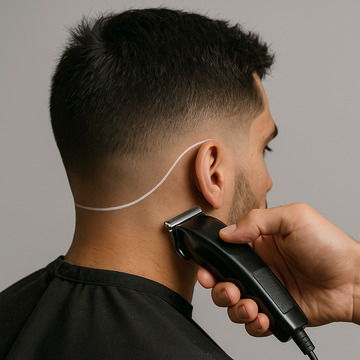
Use your trimmer or clippers with no guard to create the lowest baseline of the fade. This is the point at which the hair turns to stubble or skin.
Now, position the line slightly above the ear for a low fade. Start at the area of the temples for a mid-fade. Moving forward, target the upper corners of the head for a high fade. The head should be neatly encircled by this line. Imagine it as the base of a hill that you are going to ascend.
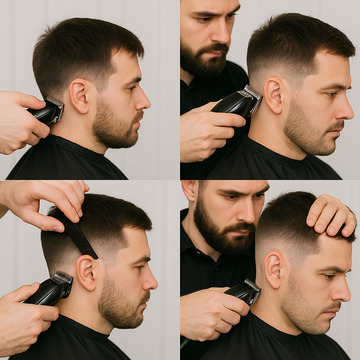
Step 4: Blend Up Gradually
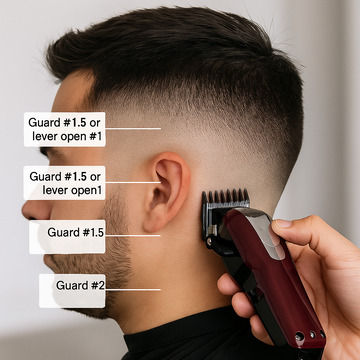
Here’s where the magic happens.
- Guard #0.5 or open clipper: Just above your bald line. Move up about 1/2 inch.
- Guard #1: Slightly higher, overlapping your last section. Use a flick-out motion.
- Guard #1.5 or lever open #1: Keep building the gradient. Stay controlled.
- Guard #2 and up: Continue fading until you connect with the longer hair at the top.
Always work in segments. Before going on to the next side of the head, finish the first one. Moreover, examine all of your options, and don’t be scared to take a step back and reflect.
Your clippers’ taper lever aids in fine-tuning the blend. Smooth out any rough steps between guards by using it halfway open.
Step 5: Detail and Clean Up
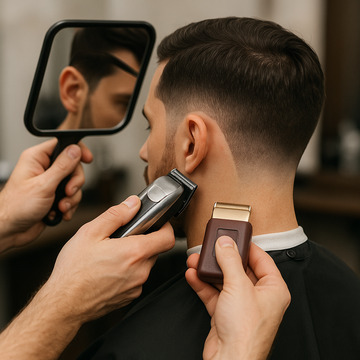
This stage differentiates an impressive, shop-worthy result from a fade that is “just acceptable.”
- To go over thick lines or dark areas, use the corner of your clippers.
- For neat lines around the neckline, sideburns, and ears, use your trimmer.
- For a second look, use a hand mirror. No fade will look fantastic from a single view.
Now is the perfect time to use a foil shaver or razor at the root for a spotless, bald appearance if you want a skin fade.
Do You Want a Bit More Style? Think about including a side part, a line-up at the top of the head, or a delicate shaved line as a design feature. Without requiring a complete makeover, these little extras can add flair to the fade and make your haircut feel more unique and personal.
Read More: The Mens Fade Haircut Everyone’s Asking For in 2025
Avoid Common Mistakes
Even skilled barbers make mistakes from time to time. These pointers will assist you in avoiding rookie errors:
- Take your time blending. The key to the fade is patience.
- Work in areas that are clean, as uneven outcomes come from careless sectioning.
- Start longer. You can always go shorter.
- Make use of a mirror arrangement that displays all angles. Fades are killed by blind spots.
- To remove bulk, always cut with the grain. For fading only, go against the grain.
If you mess up? Don’t panic. You can clean up a bad blend. Worst case? Buzz it short and call it a reset.
Maintenance and Upkeep
After getting answers to how to do a fade haircut, let’s move onto something important…
When a fade is new, it looks its best, but sadly, that doesn’t last long. A fade loses its appeal the moment stubble returns, unlike longer hairstyles that may be managed for a few weeks without seeming scruffy. You’ll need to touch it up more frequently if the fade is tighter and cleaner, especially skin fades.
- Touch-up frequency:
Weekly touch-ups are best for fresh skin fades. A professional fade can become a sloppy jumble after just two weeks of neglect, erasing its clear transitions. With softer blends, low or mid fades can last for two to three weeks before needing to be refreshed. However, you’ll want to edge up more often to retain your sharp looks if you wear your fade as part of a daily groomed look, such as in sales, tourism, or public-facing positions.
- Tools for upkeep:
Every time, you don’t have to start over with the entire cut. The general structure may usually be maintained by brushing up the sideburns as well as keeping a neat neckline. In this instance, a trimmer or edger is your best friend. Use it for cleaning the area behind the ears, removing fuzz from the neck, and going over the hairline.
To refine the mix, trim the lowest guard area (such as the #0.5 or #1 zone) if you want to take it a step deeper. A fading fade can be revitalized with just a few minutes.
Wrap-Up: Practice Builds the Blend
FIRST: Proper fading requires more than simply the right tools. This has to do with muscle memory. Your hands and eyes will get more in sync as you cut more fades. Start with very mild fades on a mannequin head or yourself. Observe how your outcomes consistently get better.
SECOND: It’s more than just the blend that makes a good fade stand out. It’s a statement about the man who wears it. Sharp, tidy, and well-assembled.
Whether you want to grow your barbering abilities, save money, or just enjoy the fulfillment of doing it yourself, this guide for Fade Haircut will help you get there. Now, steady your hand, plug in those clippers, and fade like an expert.
FAQs
How to fade hair step by step?
Drying and cleaning hair should come first. As you proceed to the sides and back, start with the clipper with the longest guard and work your way down in guard sizes. At the line where lengths change, begin at the bottom and flip the clippers outward. Check for symmetry with a mirror.
Last but not least, trim the sideburns and neckline with a trimmer or without a guard for clean edges. Lever adjustment or a midway guard can be used to blend visible lines.
How to cut a fade using clippers?
Cut the top part first, then attach the longest guard. Next, choose a mid-level guard (such as #2) and begin right above the ears. To create a gradient, move upward and flick out. To get closer to the fade’s base, use a lower guard (such as #1 or open blade).
Try a 1.5 guard or use the lever to change the blade length to make the distinctions between levels less clear. Finally, use a trimmer to align the neckline, ears, and hairline.
How to give yourself a fade haircut with clippers only?
To see the back of your head, use a fixed mirror and a handheld mirror. Use the longest clipper guard to cut the top. To avoid harsh lines, start fading at the sides with a mid-length guard and flick outward. Repeat the flicking motion as you descend to a shorter guard beneath that segment.
To merge lines, use the lever or between guards. Finally, use a detail trimmer or the naked clipper blade to clean up the edges.
How to fade hair for beginners with clippers?
Begin with three guards: a short (bottom), a mid (sides), and a long (top). Use the mid-length guard a little higher, overlapping slightly, after starting with the shortest guard at the bottom. To make the transition softer, flick out as you ascend. Use the longest guard for the top, and then use an intermediate guard or a lever to integrate the center section where the guards meet. Make sure your strokes are steady and gentle.
What clipper number to use for a fade?
For skin-tight fades, typical fade setups use #0 or no guard at the base, #1 or #1.5 right above it, and #2 to #4 for the mid to upper sides. With respect to the preferred length, the top can be anywhere from #4 and #8. To fine-tune the blending within guard levels, use the taper lever adjustments.